Sunday, March 29, 2015

Booster and Truevisions Cable

I have been having problems with the cable signal since I moved in my new house. Well, it was not that bad, I mean most of the time I can watch my favorite channels without any problems. But sometimes the signal dropped on certain channels and I got mosaic pictures or only heard sounds without any pictures.

The cable company told me I had too many outlets and too long coaxial cable inside the house, and recommended that I put in a "booster" to help. The situation was acceptable to me at the time so I went on without it.

Lately the signal got worse, I got mosaic picture too often, and sometimes I even got a "no signal" screen. So I thought it's the timei to install a booster. However, calling a cable guy in to fix that would be too expensive so I decided to do that myself. I tried to search for information but could not find much so I decided to share it here. Note that I have a digital cable (TrueVisions) as in coaxial cable from the tap in front of my house, not a satellite feed.

What you need: a booster (of course), cables, and connectors. A booster can also be called an amplifier.

Buying a booster: first thing when you look for a booster is its operating frequency band. Usually the channels in the higher frequency range are more likely the ones having signal problems because higher frequency signal suffers more loss in the cable. So look for a booster in UHF range, from 300-1000MHz. It's gonna be hard to find one that operates up to 1000MHz, especially in Thailand. I couldn't find one either (the one I got was up to 870MHz), but I was told some shops carry such model.

Now you will see terms such as multi-band/wide-band/UHF-only. They are technical terms regarding how it works. A multi-band booster has filters in it and lets you adjust signal strength in each band (VL, VH, U). A wide-band booster covers its all frequency range. I got a wide-band and it's working fine.

A booster with gain and slope adjustment knob is better as you can adjust the signal to best suit your needs. Please note, however, to correctly adjust gain/slope you may need a special equipment. Cable company engineers usually carry this tool, and they can help you fine tune your booster in case you are unable to.

Now you need a short cable with F-type connectors on both end. You can ask the shop you buy the booster to make one for you. They usually have excess cable, and may give you one for free, or for a small amount of money.
 
The installation is easy. You just put the booster in before the splitter, i.e. cable from company <---> booster <---> splitter <----> cable box. That's it.

Saturday, July 18, 2009

Connecting Android Phone Through Adhoc Wifi Network

An Android phone works perfectly when you have a wireless connection, either through wifi wireless AP or mobile network GPRS. However, when it comes to places where only wired connectivity is available, for instance an Ethernet connection or a dial-up connection, or when you're roaming and using mobile network's data roaming might cost you a fortune, some workaround must be done.

My HTC Magic works fine back at home. I got both unlimited wifi and GPRS connectivities. But when I roam elsewhere, which I do a lot, the data roaming cost would be too high and most hotels I stay have no wifi but only wired Ethernet in-room.

One thing which I know will work is to carry with you a wireless AP, plug the LAN cable in, and you're all set. But I don't want to add any more weight to my bags. So I think about turning the laptop into an access point instead.

So I did some searches and found a very useful information at modmygphone.com's forum. The thread mentioned configuring your G1 Android phone to connect to a laptop's ad-hoc wireless network. That's exactly what I need!

I didn't modify the files directly on the phone, but instead I used adb pull the 2 files onto my laptop, then edited the files, then adb push them back. So the steps were:

> adb pull /system/etc/wifi/tiwlan.ini tiwlan.ini
> adb pull /data/misc/wifi/wpa_supplicant.conf wpa_supplicant.conf

[.edit tiwlan.ini and wpa_supplicant.conf according to the guide]

> adb shell
# mount -o rw,remount -t yaffs2 /dev/block/mtdblock3 /system

# exit

> adb push tiwlan.ini /system/etc/wifi/tiwlan.ini

> adb push wpa_supplicant.conf /data/misc/wifi/wpa_supplicant.conf
> adb shell
# mount -o ro,remount -t yaffs2 /dev/block/mtdblock3 /system
# exit

>

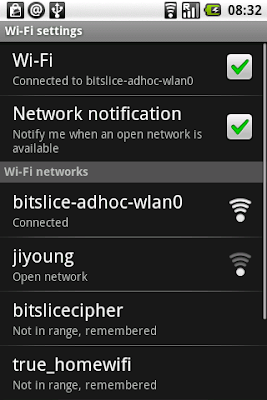
You will see your ad-hoc wifi network name in networks list (Settings -> Wireless controls -> Wi-Fi settings). Phone modification part is complete.

Now back to the laptop. An ad-hoc wireless connection has to be created and Internet Connection Sharing enabled. There are many guides available on the Internet. (for example here.) When it's created, in "Choose a wireless network" window, select your ad-hoc network and click "Connect." Your phone and laptop should try to connect to each other and you're all done!


In case you're unlucky and your hotel network assigns IP address in 192.168.0.0 net, ICS will not work. Try create a network bridge between the wireless connection and LAN connection instead.

Have fun with your Android! ;-)

Tuesday, March 10, 2009

Lost My Wallet

Last Saturday I had to go to Chiangmai to attend my girlfriend's best friend's wedding. We're booked for the earliest 6.30am flight.

I got up at 4.30am and on the way to the airport I stopped at 7-eleven at a PTT gas station to grab a cup of coffee and to get some cash from the ATM nearby.

Everything went fine until the plane had landed at Chiangmai Airport when I reached for my wallet to pay for the car rent and... it wasn't there!

The following hour was spent trying to locate the wallet in every bags, figuring out whether I'd left it in my car in Bangkok and finally calling banks to suspend the credit cards (some were kind enough to let me suspend temporarily).

After a while I managed to get over it and went on with the trip.

--

Later that day my girlfriend's sister was kind enough to drop by the gas station just in case someone had found it.

Guess what? It was there! A 7-eleven cashier found it!!

You might wonder why I'm so excited but in Bangkok when you lose your wallet or another valuable things you rarely get them back.

Now I'm thinking what I should do to show my appreciation to the girl.

Tuesday, June 03, 2008

PFT

Oh, it's been such a long time. And there's nothing much to write. Anyway my simulator exam sessions, or PFT, are scheduled this Thursday and Friday. Have to study a lot.

By the way, my Twitter timeline gets updated more often so you might want to check that out.

Thursday, May 08, 2008

Bye bye Gisteq, Hello Holux

As mentioned in my earlier entry about logger device. I'd enjoyed using it for a while but unfortunately I'd lost it in Dubai. -_- Well, I turned it on while sitting in a cab and thought it might get better satellite reception if put in the back of the seat, near the windshield. Then when I got to the place I just jumped off, leaving the tracker behind...

It's a Gisteq Phototrackr unit. It's based on Nemerix chipset and supports 16 channels tracking. My experience with it was good. Almost all the time it's got accurate position. Supplied program, Phototrackr, did a great job downloading data and geocoding photos. It also associated photos to Google Map, letting you see exactly where they were taken.

To be able to continue tracking my photos, I've bought another tracker, this time it's Holux M-241, and it just arrived today.

This M-241 has got a MTK chipset which supports 32 channels tracking. It has a display on it which can show its status, position, etc, and can be used to edit its settings. And it's 30 bucks cheaper than my previous Gisteq. However, it doesn't have extensive software support like the Phototrackr. From my research through the net, there are a few people using it and someone's already posted an alternate solution, so I thought it'd be ok to get it.

Will give it a test run for a few days. More on this later.

Friday, May 02, 2008

Genius Pianist

Ref: Star King #8 - Five Year Old Blind Genius Pianist (en) on YouTube.

She is amazing!! Blind since she's born. At the age of 3 she heard her mother sing and can play the song right away.

See her 2nd appearance in the show here.

Thursday, May 01, 2008

Hello D300

I've just got a new digital SLR camera--the Nikon D300. Took me a long time to finally make the decision (I was about to buy a DSLR when D200 was out to the market, that's a few years now).

After playing with it for a while, I'm getting used to its functions and controls. Quite different from my previous F90x which was bought about 13 years ago back in 1995. It's a nice camera, with good quality images comparing to affordable price.

See some pictures at my flickr page or click picture below.

BMW on the road
BMW on the road
Originally uploaded by bitslice.